Class 7 ~ Digital Tools For Use in the Classroom
Several digital tools will be used in my classroom to meet our teaching and learning needs. While I will still continue to introduce my students to the many ed tech tools I learned about through this course, the most used digital tool by my students at this point will be Google Drive. It is easily assessible because of the District-created individual student login. Google Drive has several capabilities available for digital creations, individually or in real-time/simultaneous collaboration: Google Docs for posters, handouts, infographics, timelines, publishing, file sharing, etc.; Google Sheets for data collection/display, various charts/graphs, etc.; Google Slides for presentations, mind-mapping, assessments, etc.; and, Google Forms for surveys, data collection, etc. In addition, because my students work on Chromebooks, we will all learn together about the various extensions available for their use. One group learned on their own how to use Powtoons through the Chrome browser extensions for a recent presentation on Internet Safety and Digital Citizenship. Digital natives are not afraid to explore digital possibilities!
Because Google Drive will be the most used digital tool in our classroom, I used Nimbus Screenshot and Screen Video Recording for the first time to create an entry level flipped lesson about "How to Create, Name, and Share a Google Doc" as shown in the video below this text, so students will know how to use digital documents collaboratively with their classmates and/or me. In this case, the explicit expectations for how the document should be titled as well as the criteria for identification and formatting is included, which will create uniformity for me in locating their individual documents easily. The end product which is shared with me will be assessed for (1) following my instructions to create, name, and share their document and (2) the content included in the body of the document.
In retrospect of the recording, I see that it could be improved by telling students specifically to use the Chrome browser; however, because students are using Chromebooks in my classroom they will naturally open a Chrome browser. Nonetheless, it would still be better to clarify that requirement if they need to create a Google document outside of the classroom while using a non-Chromebook device.
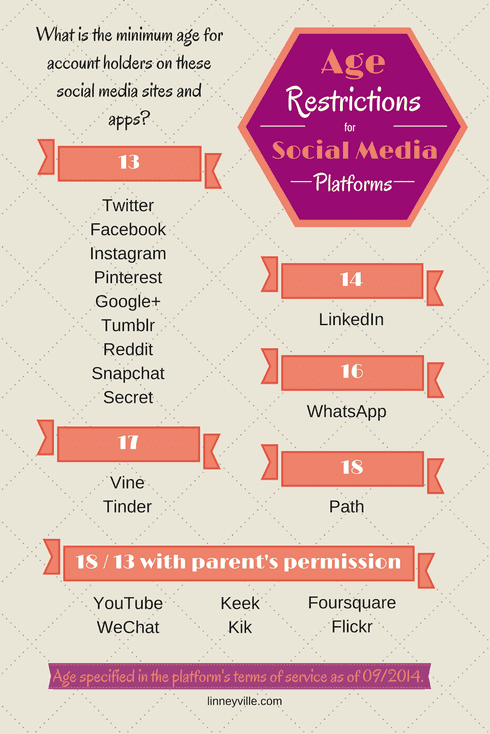
Infographic Credit: linneyville.com as found on SocialTimes http://www.adweek.com/socialtimes/social-media-minimum-age/501920
Class 6 ~ Screencasting and Flipped Lessons (Just added: Take a look at my Nimbus screencast flipped lesson in the Class 7 section above!)
The benefits of screencasting and flipped lesson go beyond my list:
The Vocaroo recording was specifically created to be shared with my students and their parents. Many parents immediately responded positively to the homework expectations clarification. It can be found at http://vocaroo.com/i/s0t2r8SGgGMZ
Through this class, I also learned to use the WeVideo mobile app and created an announcement that was tweeted, shared on Facebook, and emailed about our schoolwide participation during the weeklong "Hour of Code." That video announcement can be found on https://www.youtube.com/watch?v=o-cKF3iKP34&feature=youtu.be
The benefits of screencasting and flipped lesson go beyond my list:
- When students, parents, and/or colleagues hear my voice recording, it becomes a more personalized nuanced experience rather than the text-only experience, which could be subject to interpretation.
- When set-up (that is, after the time input of lesson planning, researching the needed tech tools for content and assessment materials, etc.), then it can be used indefinitely, which could save time.
- It can used 24/7 as a reference (preview, instruction, review).
- The two tech tools I used for this assignment for highly user-friendly and easy to use, which saved lots of time and I believe conveyed the intended messages in a friendly manner.
- These tech tools can be used also as assessment tools if students use them to demonstrate/communicate their understanding of the content learned.
The Vocaroo recording was specifically created to be shared with my students and their parents. Many parents immediately responded positively to the homework expectations clarification. It can be found at http://vocaroo.com/i/s0t2r8SGgGMZ
Through this class, I also learned to use the WeVideo mobile app and created an announcement that was tweeted, shared on Facebook, and emailed about our schoolwide participation during the weeklong "Hour of Code." That video announcement can be found on https://www.youtube.com/watch?v=o-cKF3iKP34&feature=youtu.be
Class 5 ~ Using Infographics in the Classroom
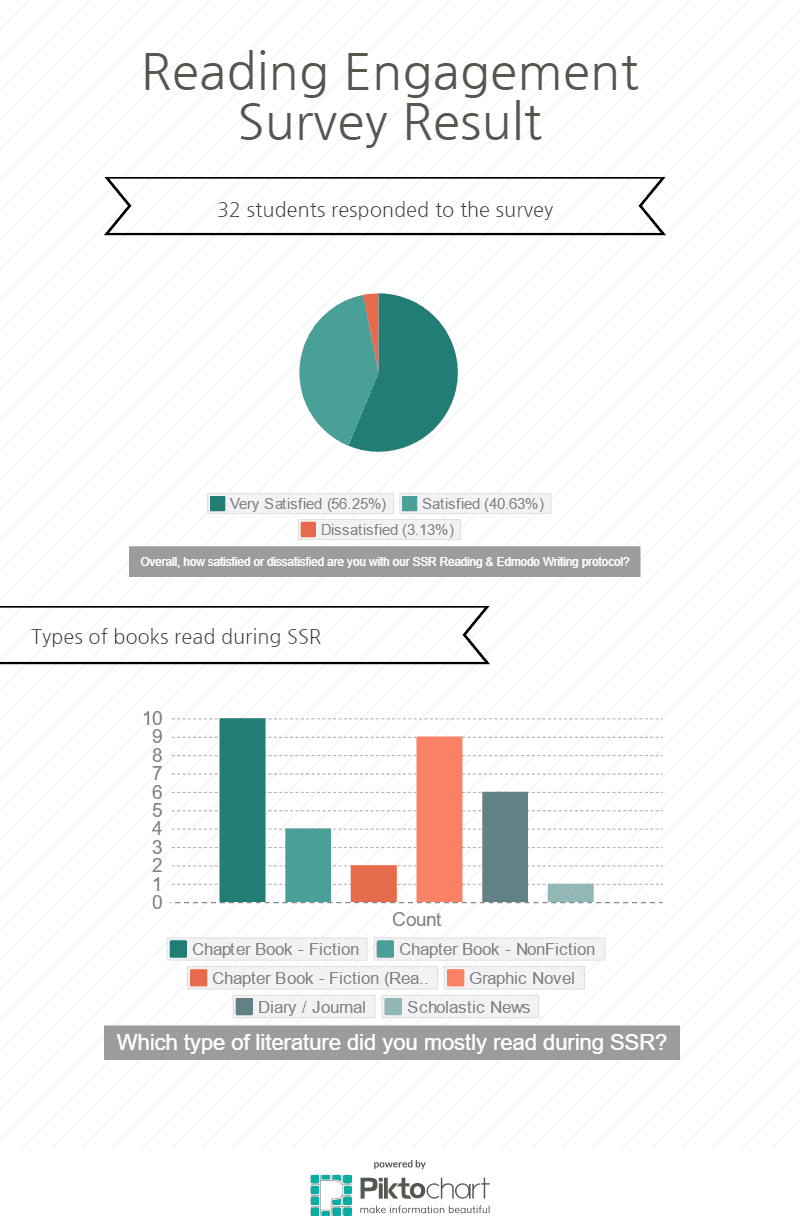
After exploring the four websites/apps (easel.ly, Piktochart, Venngage, and Visme) for creating my own infographic, I found Piktochart to be the easiest for me to use to display the results of my action research completed during the first class of this Innovative Learning Master of Education (M.Ed.) program. It was important for me to consider the CRAP Design principles while creating it: C=Contrast, R=Repetition, A=Alignment, and P=Proximity, which we discussed not only in this class, but also in the EDU 791 class while reading Dr. Bobbe Baggio's book, The Visual Connection.
After exploring the four websites/apps (easel.ly, Piktochart, Venngage, and Visme) for creating my own infographic, I found Piktochart to be the easiest for me to use to display the results of my action research completed during the first class of this Innovative Learning Master of Education (M.Ed.) program. It was important for me to consider the CRAP Design principles while creating it: C=Contrast, R=Repetition, A=Alignment, and P=Proximity, which we discussed not only in this class, but also in the EDU 791 class while reading Dr. Bobbe Baggio's book, The Visual Connection.
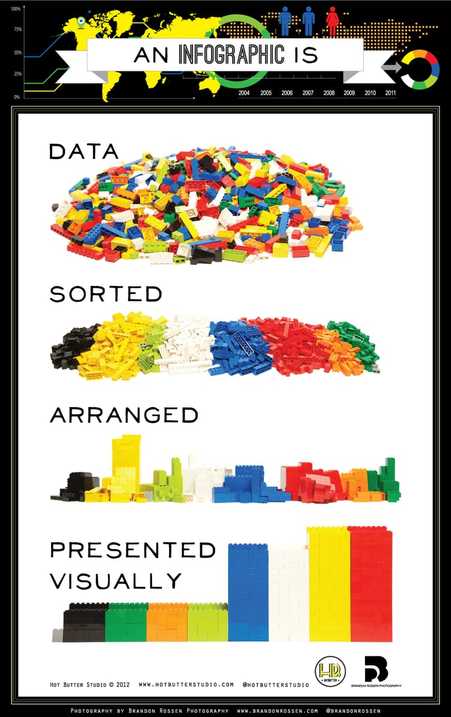
This infographic from HotButterStudio.com vividly shows the power of how "a picture is worth a thousand words!"
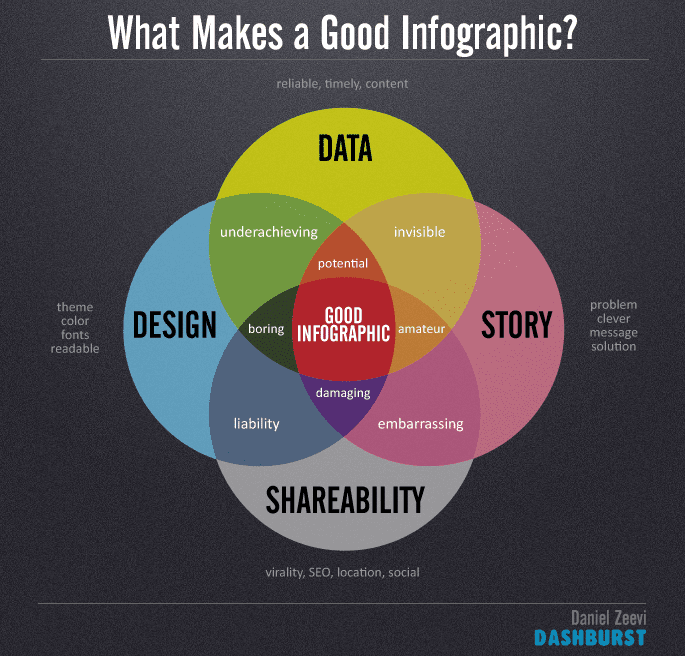
Graphic Credit ~ https://visual.ly/what-makes-good-infographic?favNode=62546
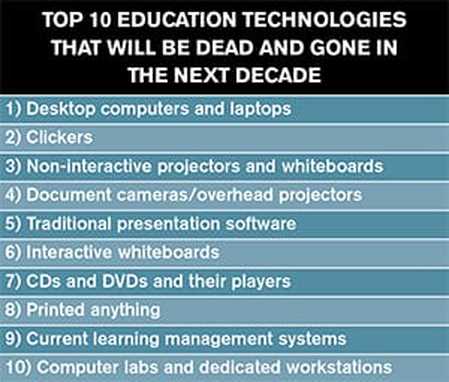
Graphic Credit ~ https://campustechnology.com/articles/2016/11/02/top-10-education-technologies-that-will-be-dead-and-gone-in-the-next-decade.aspx
|
|
Class 4 ~ Using Social Media in Education
Jenny Knox and I were partnered by our class instructor to create a presentation using a new tech tool to summarize "The Case Against Social Media," a blog piece by Andrew Campbell. Haiku Deck was utlimately decided as the tool we would use. It has beautiful graphics and was relatively user-friendly. Jenny created the presentation; this app does not allow real-time simultaneous, hands-on collaboration. In addition, Haiku Deck is free for only a 7-day trial period. The cost to use this app would be the obstruction that prevents students and me from having it as our "go-to" presentation tech tool. The Haiku Deck summary presentation can be accessed at https://goo.gl/mNskwQ.
Jenny Knox and I were partnered by our class instructor to create a presentation using a new tech tool to summarize "The Case Against Social Media," a blog piece by Andrew Campbell. Haiku Deck was utlimately decided as the tool we would use. It has beautiful graphics and was relatively user-friendly. Jenny created the presentation; this app does not allow real-time simultaneous, hands-on collaboration. In addition, Haiku Deck is free for only a 7-day trial period. The cost to use this app would be the obstruction that prevents students and me from having it as our "go-to" presentation tech tool. The Haiku Deck summary presentation can be accessed at https://goo.gl/mNskwQ.
Class 3 ~ Building my Professional Learning Plan (PLP) and Timeline as well as my Professional Learning Network (PLN)
There are many Ed Tech Tools I would like to explore either for the first time or to revisit. The initial thoughts of my PLP can be found at goo.gl/DM63XJ and of my Timeline can be found at goo.gl/YzaAcx.
There are many Ed Tech Tools I would like to explore either for the first time or to revisit. The initial thoughts of my PLP can be found at goo.gl/DM63XJ and of my Timeline can be found at goo.gl/YzaAcx.
Class 2 ~ Teaching Digital Literacy and How to Integrate Technology in the Classroom
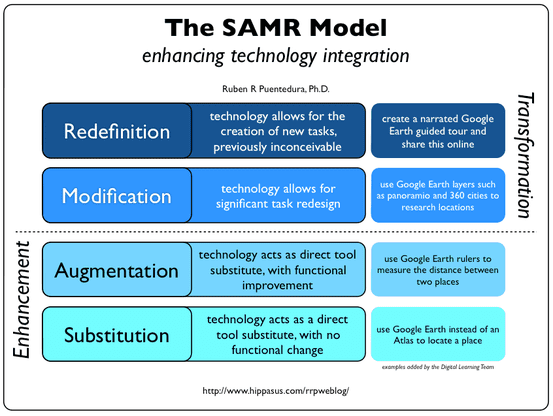
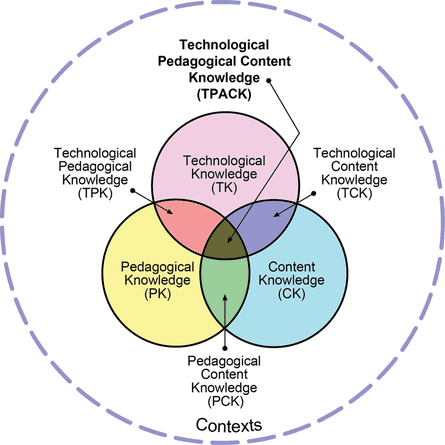
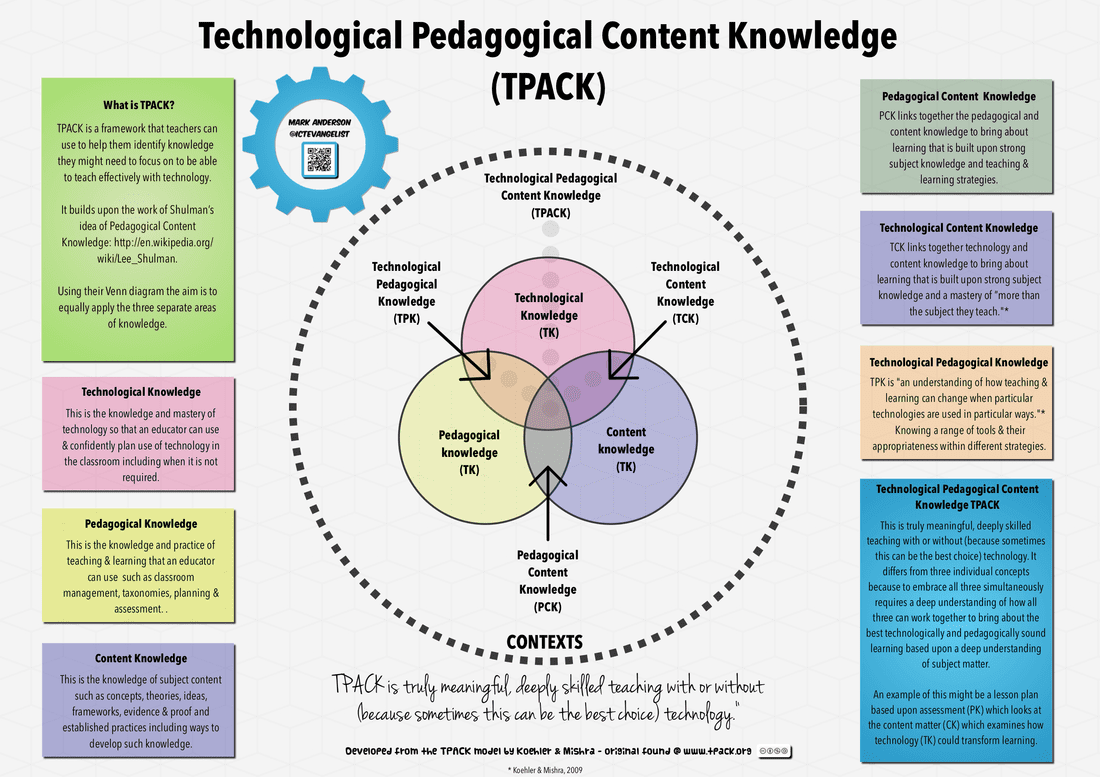
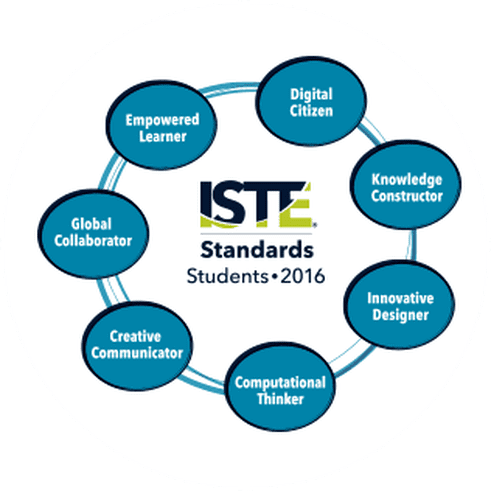
Graphics and content of The SAMR Model as developed by Ruben R. Puentedura, Ph.D.; the TPACK framework originally found on www.tpack.org; and ISTE Standards for students from http://www.iste.org/standards/standards/for-students-2016 were discussed. See below.
Graphics and content of The SAMR Model as developed by Ruben R. Puentedura, Ph.D.; the TPACK framework originally found on www.tpack.org; and ISTE Standards for students from http://www.iste.org/standards/standards/for-students-2016 were discussed. See below.
Classes 1 & 2 ~ Teaching Digital Citizenship
During these classes, we learned about the
During these classes, we learned about the
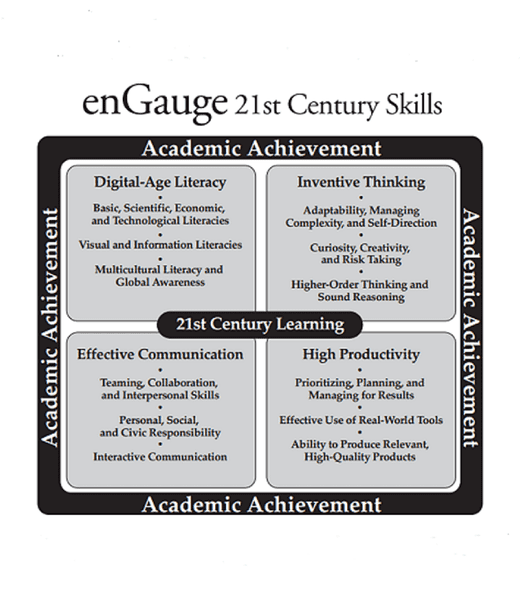
- 21st Century skills needed for K-12 students to be authentically ready for a career and/or college as shown in the bottom graphic from enGauge 21st Century Skills: Literacy in the Digital Age (http://pict.sdsu.edu/engauge21st.pdf)
- 9 Themes/Elements of Digital Citizenship (http://www.digitalcitizenship.net/Nine_Elements.html)
- Digital Divide / Access - Full electronic participation in society
- Digital Commerce - Electronic buying/selling of goods
- Digital Communication - Electronic exchange of information
- Digital Literacy - The process of teaching and learning about technology and its use
- Digital Etiquette - Electronic standards of conduct or procedure
- Digital Law - Electronic responsibility for actions & deeds
- Digital Rights & Responsibilities - The freedoms extended to all participants in the digital world
- Digital Health & Wellness - The physical and psychological well-being within the digital world
- Digital Security (self-protection) - Electronic precautions to guarantee safety
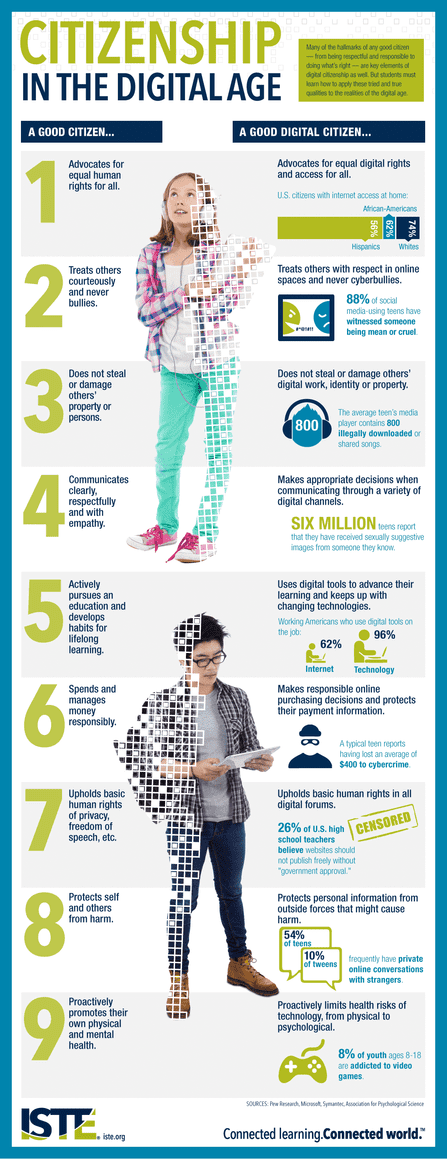
- Similarities between being a good citizen in society and a good citizen in the digital world as shown in the bottom ISTE poster, which was retrieved at https://www.iste.org/explore/articleDetail?articleid=192 -- These similarities are important to my students because they coincide with our Napa Valley Unified School District's BEST Behavior Expectations.
- Need for teachers to explicitly teach digital citizenship to their students; so, I created a lesson plan for my 4th graders to learn how to respect the work (text, graphics, photographics, etc.) of others by citing the author, book, and/or website used as resources for their research. My lesson plan can be accessed below.